Monday, April 13, 2020

{Four Seasons} Summer: Backyard Cookout

*I will be posting this series in chronological order, as far as how the project developed/evolved, and the order the pieces were finished in, rather than in seasonal order.  Which actually now that I think about it does technically end up being seasonal order, just starting with Summer rather than at the beginning of the calendar year with winter....

So starting with summer....
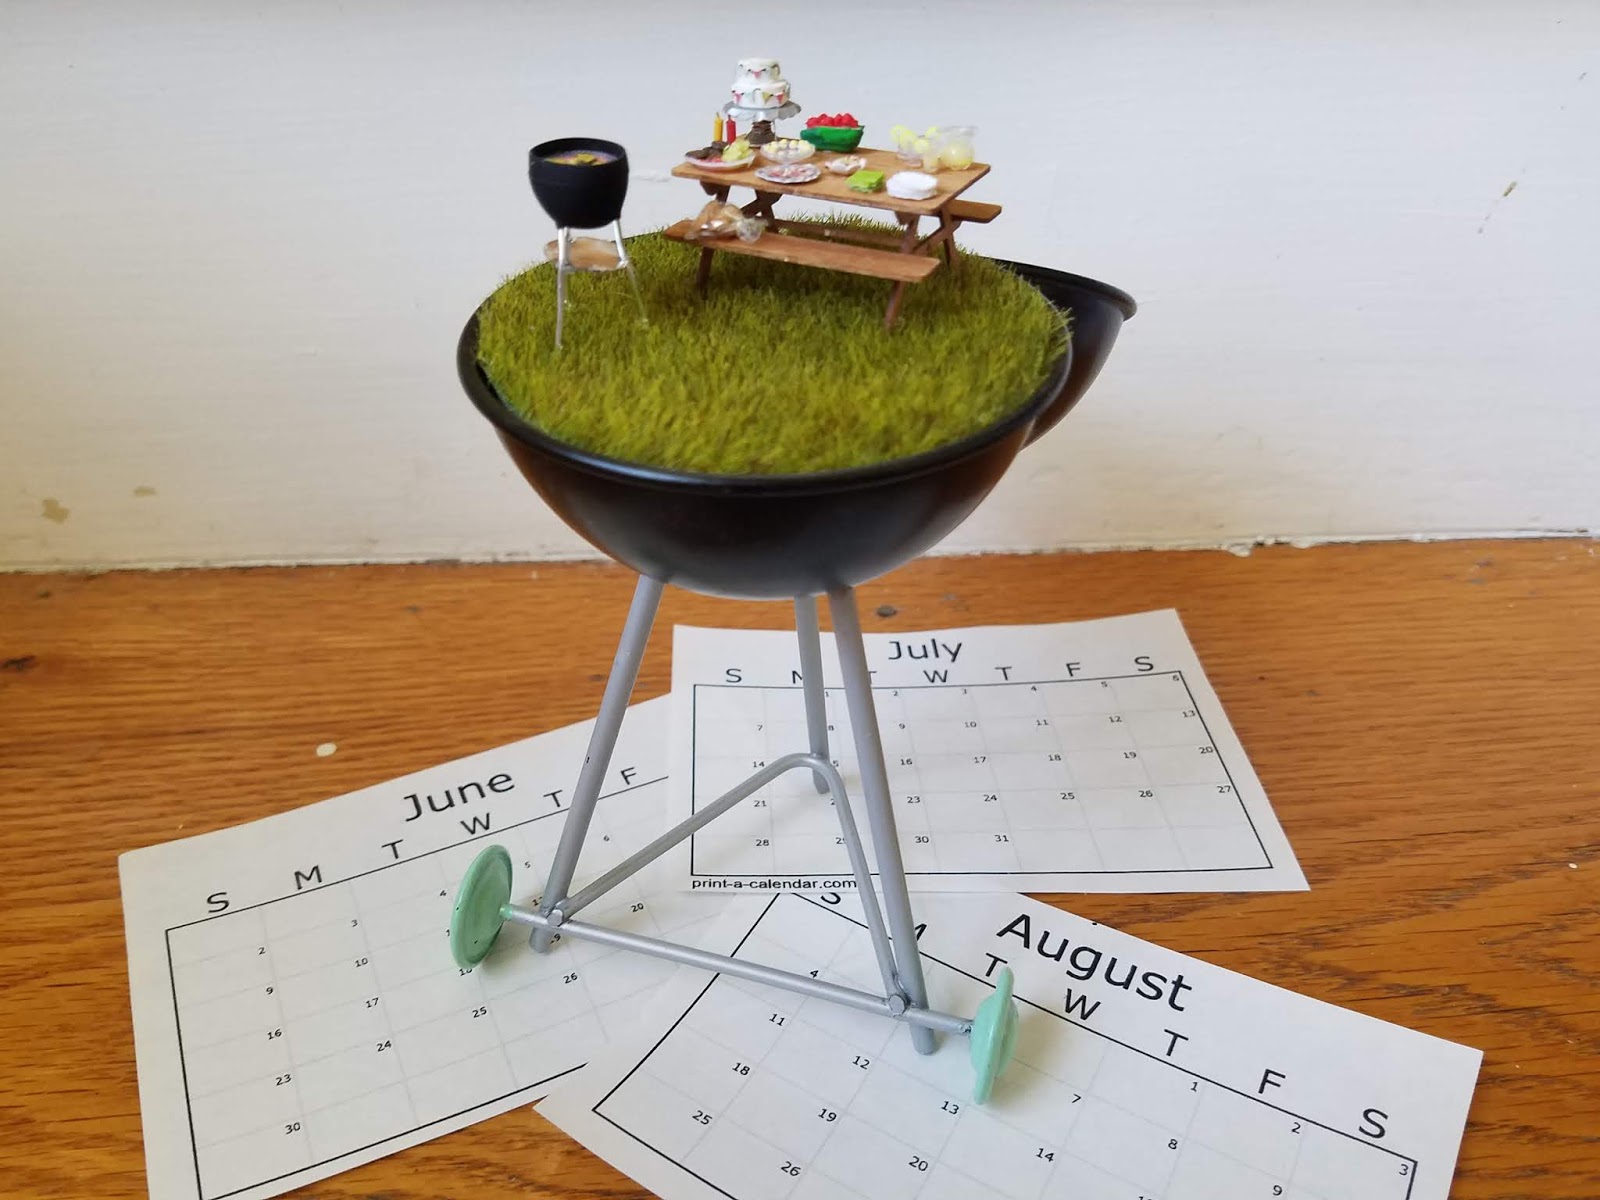
"Summer: Backyard Cookout"
This was originally intended to be a one off, quick little weekend project, of a little backyard barbecue scene in this cute little toy(?) grill I got from Target from the Dollar Spot (which I know isn't what they call it anymore now that there's multiple price points, but I'm not 100% sure what they do call it now so we're going to just got with dollar spot for now lol) for a few dollars.
  (It obviously didn't end up staying a quick little one off project, but I'll get into how that came to be in a little bit). I actually had gotten a different little toy/decorative grill a year or two before from Target thinking I could do something with it in miniature, but it was a mint green type color, which was super pretty but not very realistic looking, and I never really ended up going any further than buying (honestly not even sure where it is right now).  When I saw the ones they had this past year and saw that the body was black and more "real" looking the idea resurfaced and this time actually happened. I knew I wanted the scene to involve a 1:48 scale grill inside the decorative/toy grill, but that's about as far as the planning had gotten the first time I bought one of these little grills.  This time I ended up with the idea of a backyard cookout party, with a grill and a picnic table set up as a buffet for the party.  Because I wanted it to be a quick project I didn't want to have to figure out the measurements for and cut all the pieces for a picnic table so I went looking for a 1:48 scale kit for it and ended up ordering one from Stewart Dollhouse Creations.  I also ordered a deviled egg mold/kit when I saw that because what good Virginia summer party doesn't include deviled eggs, and I got a kit to make a pitcher of lemonade and glasses, that came with 3D printed pitcher and glasses, and the tiniest lemon slices, and instructions on how to finish it all off. I seriously love everything I've ever gotten from them, they are one of my all time favorite places to shop for things I need for miniature projects!

This project came up right as we were getting ready to spend a weekend at my parent's house dog sitting while they were out of town, and that seemed the perfect opportunity to be able to have a whole weekend completely devoted to it and get it done. It was also a good project to bring with me because I was able to easily pack up everything I needed for it in one backpack and not have to carry too much back and forth.

The first step was making a base inside the grill for everything to sit on, which actually ended up being super easy because I had a foam ball that was just the right size when cut in half to fill the bottom section of the grill. I topped that with a circle of artificial grass that I buy at least a couple packages of every year at Walmart at Christmas time.  Its meant to be for their little Christmas villages they have, but its' perfect for miniatures.  And I really feel like it could work for pretty much any scale other than 1:144. Obviously I used it here for 1:48 and it doesn't look ridiculously long, but I've put it next to some 1:12 scale stuff and it doesn't look crazy short....

I put the picnic table together first of the kits, but the one I was really excited to do was the deviled eggs, and I'm not going to lie it was a a bit of a challenge working with bits of clay that tiny, but O.M.G. it turned out so cute!


I made the cake using the cake mold I had gotten from Stewart Dollhouse Creations back when I was doing the Flutterby Bakery.  I actually somehow ended up with kind of a lopsided cake this time, but I went ahead with it since my goal was for this to be a quick project, and I envisioned the party as being somewhat casual, maybe thrown together at the last minute, by someone who loves to entertain and absolutely would make a decorated cake for it, but was totally fine if everything wasn't 100% perfect for this particular party. The summery bunting is little tiny triangles of scrapbook paper.

The lemonade came next (because again, you can't have a summer party without lemonade!) and it just turned out so stinking cute! the lemon slices included in the kit were the perfect finishing touch!

Of course a party needs more than just deviled eggs, cake and lemonade, and again since I am from Virginia, near the Chesapeake Bay, crabs are a must have.  I ended up cutting out tiny pictures of cooked crabs, which at that size they weren't all perfectly trimmed, which you can tell in the close up pictures, but really can't tell that much on an overall picture or looking at it in person.  Also of course had to have a watermelon and I made that from clay.  Coleslaw is another necessity for a summer cookout and I made that by cutting tissue paper into the tiniest little slivers and mixing just a bit of white paint into mod podge to make the dressing for it, I was actually really happy with how it turned out. I had thought about attempting a potato salad too, but ended up deciding against it mainly for time reasons, but also partly because I wasn't convinced that I was coming up with any way to successfully make it. haha. The cake stand was made from a cardstock piece (that if I remember correctly was from a kit for something that I didn't end up using) which I folded down around the edges and then glued to a tiny screw for the base.  The plate/tray the crabs are on was a smaller circle from the same kit (I think it was supposed to make a treat stand or something.... sadly since I didn't post this when I actually made it I don't remember exactly about that), that I just shaped slightly.  The paper plates I punched from cardstock and then embossed to look like paper plates, and the napkins were cut from actual napkins that I separated into just one layer first.  I did also start making some burger patties out of clay, but I didn't get too into doing anything with them until after I got the grill done.

So, the grill. This actually gave me a lot more trouble than I expected.  After going through many different possibilities/ideas I finally settled on using a one of the extra covers from a set of earbuds that I don't really ever even use anyway, which seemed like the perfect idea.  Which it was, it just took a lot more effort to get it from earbud cover to finished grill than I expected.  I started by poking some wire into it to make the legs (which sounds easy enough, but actually was a royal pain to get them in and to stay straight and not distort anything). Then I glued a little circle of cardstock between them (also a much bigger pain to get in there with everything staying in the right place than it sounds...).  Keep in mind the earbud covers are soft so I had to keep adjusting things so that the bowl of the grill wasn't getting distorted.  My first plan was to use little pieces of black decorative vase filler gravel from Dollar Tree as the charcoal and make an actual little grill top for it.  Yeah. That didn't happen, and I actually probably worked on it way too long before accepting the fact that that was just not going to happen, lol, but I finally gave in and tapped out on that idea and ended up just printing and interior for the grill and glueing it on and that worked SOOOO much better.  The shape of the inside of the earbud cover even gave me a good surface to glue it to.

Once the grill was finally done I finished off the burgers and fixings for those.  Ive got 4 burgers still on the grill with cheese gettting melted on top and then 4 plain burgers in the platter on the table along with lettuce (little pieces of crepe paper, colored lettuce green and given some texture with my embossing stylus) and tomato slices (printed pictures of tomato slices cut out).  I had at one point thought about doing some hotdogs too, but when it came down to it I didn't really fee like making anything else and I already had the crabs so there was still more than one meat choice at this cookout. lol.

Once I glued everything in place I considered it done, and took it outside for a little photo shoot with one of our grills when we got home from the weekend at my parents.....


....However, after looking at it for a few days, I realized that I didn't have buns for the hamburgers and started thinking about how I wanted to do them.  I ended up finding adhesive round jewels at Hobby Lobby in the scrapbooking section that were the right size and shape and painted them to look like buns.  I then wrapped them in plastic wrap and tied it off with a little bit of thread to look like a twist tie.  It actually went really well and easily so I will definitely be keeping the little stick on jewels in mind for future projects.


Now it is officially done, but I've been toying with the idea of doing some sort of little fence or gate near the front in all that empty space, but have yet to decide if that's something I actually want to do or not., so it's done. lol

But..... as I was finishing up the finishing touches on this project I happened to come across a little decorative basket at ACMoore, that looked like a mini picnic basket and I thought: oooooo that would be cute with a little picnic scene on it, (which eventually evolved into the full series). But that's for my next post.......

Saturday, April 11, 2020

2019: The miniature version... {and also what I’ve been working on and planning for this year}


I knew it had been a long time since I posted anything, but when I looked and realized my last post was in 2018…. Oops!  I did actually start a post last summer, but apparently never got it finished and posted.  I do have to admit that I really didn’t get a whole lot of miniature work done this past year.  I had thought I would be finishing Whimsy Street, and also completing the 1:100 scale garage that I started for my husband’s 1:10 scale garage last year but actually neither of those ended up happening, and the only thing I really got finished last year was a smaller project series, called “Four Seasons” (more on that in a minute).  So to get caught up in this one post I’ll try to quickly talk about everything that should have gotten posted last year and then a bit about what I have planned/am working on for this year.


{2019}

So, to start with, just a quick recap of the projects that I had thought I would be finishing last year but didn’t……  Of course my biggest in-progress project is “Whimsy Street Shopping District”. (which you can read about the overall plan for here, in fact most of my posts for the past couple years have been about various aspect of this project).   I got a good start on the bookstore, which is the second to last shop I have to finish for it (assuming I don’t add any other shops to the street, there have been a couple other ideas that have popped into my head…….). The structure is put together and the outside is done, with the exception of door and windows, I haven't gotten a whole lot done on the inside yet, but I did get the floor for the bottom story (haha no pun intended) done and the main desk/front desk put together. I had also gotten a pretty good start with making books to fill the store with, but then ended up using a bunch of them for another project, so I still have tons more of them to make (which I did anyway, but now even more lol). I had planned on making all individual books for all the shelves, but after seeing how many I used for the other, much smaller project, I think I might see if I can be satisfied with making rows of books (as in one piece that are all attached to each other, with only spines glued on not whole separate books) for some of the areas of the store where you won’t be able to see the shelves/books quite as closely.  Even if I do end up doing that though I will still most likely need quite a few more individual books for places that can be seen more clearly, or where the whole shelf won’t be full, or sitting on display tables in the middle of the shop… stuff like that, so I expect that making books will be the most time consuming part of what there is still to do for that shop.  I might just have to devote a whole day or two to nothing but making minuscule books.  Once the bookstore is completed that will only leave the ice cream shop (which I haven’t gotten too far into the detailed plans for yet, but I think will probably not be as time consuming/labor intensive as the bookstore….).  Once all the shops are completed I will be making an actual street for them to go on, but I think I’m going to have it so that they  just sit on the street and are not permanently attached.  Largely because I don’t really have anywhere to store and/or display the entire street all together as one piece in my house and partly because while all the shops are part of this one larger project they can also stand alone, and I might at times want to do something with just one or just a couple of the shops separately from the project as a whole.


The other project that I was really excited to work on in 2019 was the 1:100 scale garage I am making to go in the 1:10 scale garage my husband is building for his RC cars. I’m still definitely hyped for the project, but it’s kind of on hold for now because I’ve gotten to the point that I need him to make some more decisions/put more of his garage together before I can really move forward with the tiny one.  You can read more about the beginnings of this project here though.


Now for the project I actually did do this past year, “Four Seasons”. For the sake of this post not being massively long (or massively longer than it already is anyway haha), I’m just going to give you an overview of the project and finished pictures and then I’ll do a post with more details and pictures and everything for each of the season’s separately.  This project was a 4 piece series, that started as one quick weekend project in a mini/toy grill I got from Target, in what they used to call the dollar spot (I know it’s not called that anymore since there’s a variety of price points there now, but I can never remember what it’s called now lol).  I saw it and thought it would be cute to do a backyard cookout scene in the little grill, and we were going to be dog sitting for my parents for the weekend coming up soon so I thought it would be a good project to bring with me to work on at their house, that I could get finished in the one weekend and wouldn’t require bringing but so much stuff with me.  Which was all completely true, but of course me being me, then I see a little picnic basket at ACMoore, and have to do a quick little picnic scene in that, which I end up deciding I should make a miniature version of a party we had a few years ago in our yard, which was a fall theme, so then I realize I’ve already got summer and fall, so now of course I have to come up with something for winter and spring to go with them……  I do have to say, most of them were still relatively quickly finished (spring ended up taking the longest, but still probably could have been accomplished in a weekend if I really put the effort into it…), and relatively inexpensive (Which was also one of the goals of the original idea).  I did buy a few things for them, but tried not to buy too much, and just being such small projects there wasn’t really that much that I even could have needed to buy for them anyway.  So, the series ended up being “Winter: Snow Tubing and S’mores”, “Spring: Garden Tea Party”, “Summer: Backyard Cookout”, and “Autumn: 'Welcome Fall' Picnic”. As I said, I will do posts for each piece separately with more detail and more pictures and all the stuff I would normally post about projects.
"Four Seasons": a series

"Winter: Snow Tubing And S'mores"

"Spring: Garden Tea Party"

"Summer: Backyard Cookout"

"Autumn: 'Welcome Fall' Picnic"


  {2020}

This year I do plan on working towards hopefully finishing Whimsy Street, and depending on what my husband gets done on his 1:10 scale garage working on and/or finishing the 1:100 scale garage, so far I have yet to pull either of those projects back out though.  The early part of this year has seemed to fly by, and while I should have plenty of time to be working on miniatures right now, while we are all staying home and social distancing/quarantining during the COVID-19 pandemic (which I’ll be honest is not something I ever expected to be saying, what a year we’ve all, as a nation and as a world, had so far this year!), I have been trying to use all this extra time at home to get some projects done in my real life house that have been getting pushed off for a while.  I do have another quick projects series that I’ll be doing this year, although to be honest I am behind on working on that project at this point.  The idea is a series of 1:48 scale front doors, one for each month of the year, to be displayed together once they are all completed.  My plan was to take one weekend each month and do that month’s door and have the year done by December (I actually came up with/started on this sometime between Christmas and New Years, so the December door I started working on then….  Granted its not done yet…..).  While I don’t have any of the doors finished yet, they are mostly planned out and I should be able to catch up through April if I just devote a day or two to it sometimes during this quarantine, and then be back on track for doing one a month.  Again, I will be posting more about these doors as I work on them, and if nothing else that should make sure I post to the blog at least once a month… haha….  Other than the doors project and finishing up Whimsy Street and possibly the garage, I’m not really planning on doing any other miniatures this year (as of right now anyway...), other than possibly as presents for people, especially for Christmas.  And I am going to try to get as much done on projects as I can in the next few weeks and then over the summer, because Fall is looking to be busy with traveling (assuming everything is back to normal and under control by then) with not only at least one weekend trip that was already planned for the fall, but also rescheduling 2 trips that had to be postponed from this spring….
I hope everyone is well and safe in these times, and I would love to see or hear about what projects (miniature or otherwise) you are working on while staying home this spring in the comments!

Sunday, December 30, 2018

Christmas Presents and an interesting side projects for 2019....

Well, Christmas day has come and gone (although as far as I'm concerned it's still Christmas until 12th night), and it's almost New Year.  I hope everyone had a wonderful Christmas! Now you might assume that since we're past Christmas day that I would be done with making Christmas presents, but of course I am not. LOL. But, I think I only have a few people that I still need to make stuff for and they're all getting stuff other than miniatures (I think anyway lol).  So since everyone has recieved and opened the miniatures I made for them for Christmas I thought I'd share a few quick pics of them and then tell you about an interesting side project I've got going for 2019....

Christmas Miniatures:

These are all little scenes in the little book shaped gift card gift boxes like the one I made my little Christmas kitchen in.

 The first two were in this box:

One is a fireplace scene:


and the other a library:


The next two are in this box:

One is another fireplace scene:

And this one isn't finished yet, but it's one I'm doing for myself so I'll finish it up some time in the next week or so, it'll be decorated for Christmas when it's done:
this one is actually a little further along than in this picture.... the wall and flooring have been glued down and the fireplace is attached and backed with black in the opening and both frames have been painted to a nicer golden color and have "mirrors" in them (I almost used aluminum foil as the mirror but then I found some chrome coated cardstock I forgot I had and it looked a lot more like actual mirror..... in a bigger project that I was putting more time and money into I would have gotten looking glass spray paint and used it on a sheet of thin plastic and cut it to fit, but the cardstock worked fine for this, especially being this small

Oh! and I almost forgot this one that just has a tree in it.... this one is also one I made for myself and I am still kind of debating whether I want to put anything on the walls next to the tree or tiny wrapped presents under the tree, but really it doesn't need anything else so we'll see.  Oh, and it's inside the "We wish you a merry Christmas" box:

The interesting side project:

So, my husband is really into RC cars (remote control cars) and really wanted a "Scale" garage for his cars (they are 1/10 scale), so guess what he got for Christmas...... this thing is massive (4ft x2ft and 2ft tall...) so IDK where he thinks he's going to put it, but I guess we'll figure that out at some point lol.  In the meantime, it's a kit so he gets to put it together and decorate it however he wants, which I will be helping him with.  He's been all aflutter with activity since he got it trying to figure out how he wants everything to look and everything, and along with helping him decorate the big garage, I have started another little project for it......
Last year for Christmas I got him two little 1/100 scale RC cars..... in other words RC cars for his RC cars so now I am making him a 1/100 scale garage for his little RC cars.... or as he puts it a scale garage for his scale garage.  I haven't gotten very far yet because obviously I can't do stuff in the little one until he makes decisions on the big one, but as you can see I've started on the basic structure, and I was going to use my Cricut to cut the rafters out of metallic cardstock to match the rafters in his 1/10 scale garage today, but I can't find half of the power cord.... so that will have to wait until maybe tomorrow night (we have no plans of doing anything for New Years Eve other than staying home and relaxing so that'll work out fine lol). So looking into the new year I plan to get Whimsy Street finished, but don't be surprised if you see updates on both the 1/10 and 1/100 scales garages. lol

Happy New Year!!

Thursday, December 6, 2018

Christmas Projects and winding down on the big projects for the year

This is the time of year where miniatures typically end up taking a bit of a back seat to other crafts and events going on for the holidays, and to a certain extent this year is no different, the Wee Christmas at Historic Kenmore exhibit that I'm involved in every year opened this past Sunday (it runs through the month, check out Kenmore.org or Facebook for more information if you are in the Fredericksburg area and are interested in going to see it.  This year I only have the toy store in it because I didn't end up getting the bookstore finished in time), I've gotten a bit more work done on the bookstore since my last post, but nothing too significant (I attached the two halves of the building together and have starting figuring out exactly how I want to do the windows. and then I made the floor for the first floor of the store, but I haven't actually even attached that down yet..... I also haven't really taken pictures of all that yet, so I'll give it it's own separate post sometime in the near future), and I'm moving on to Christmas projects.  This year though I have several Christmas themed miniatures I'm working on both for myself and for presents.

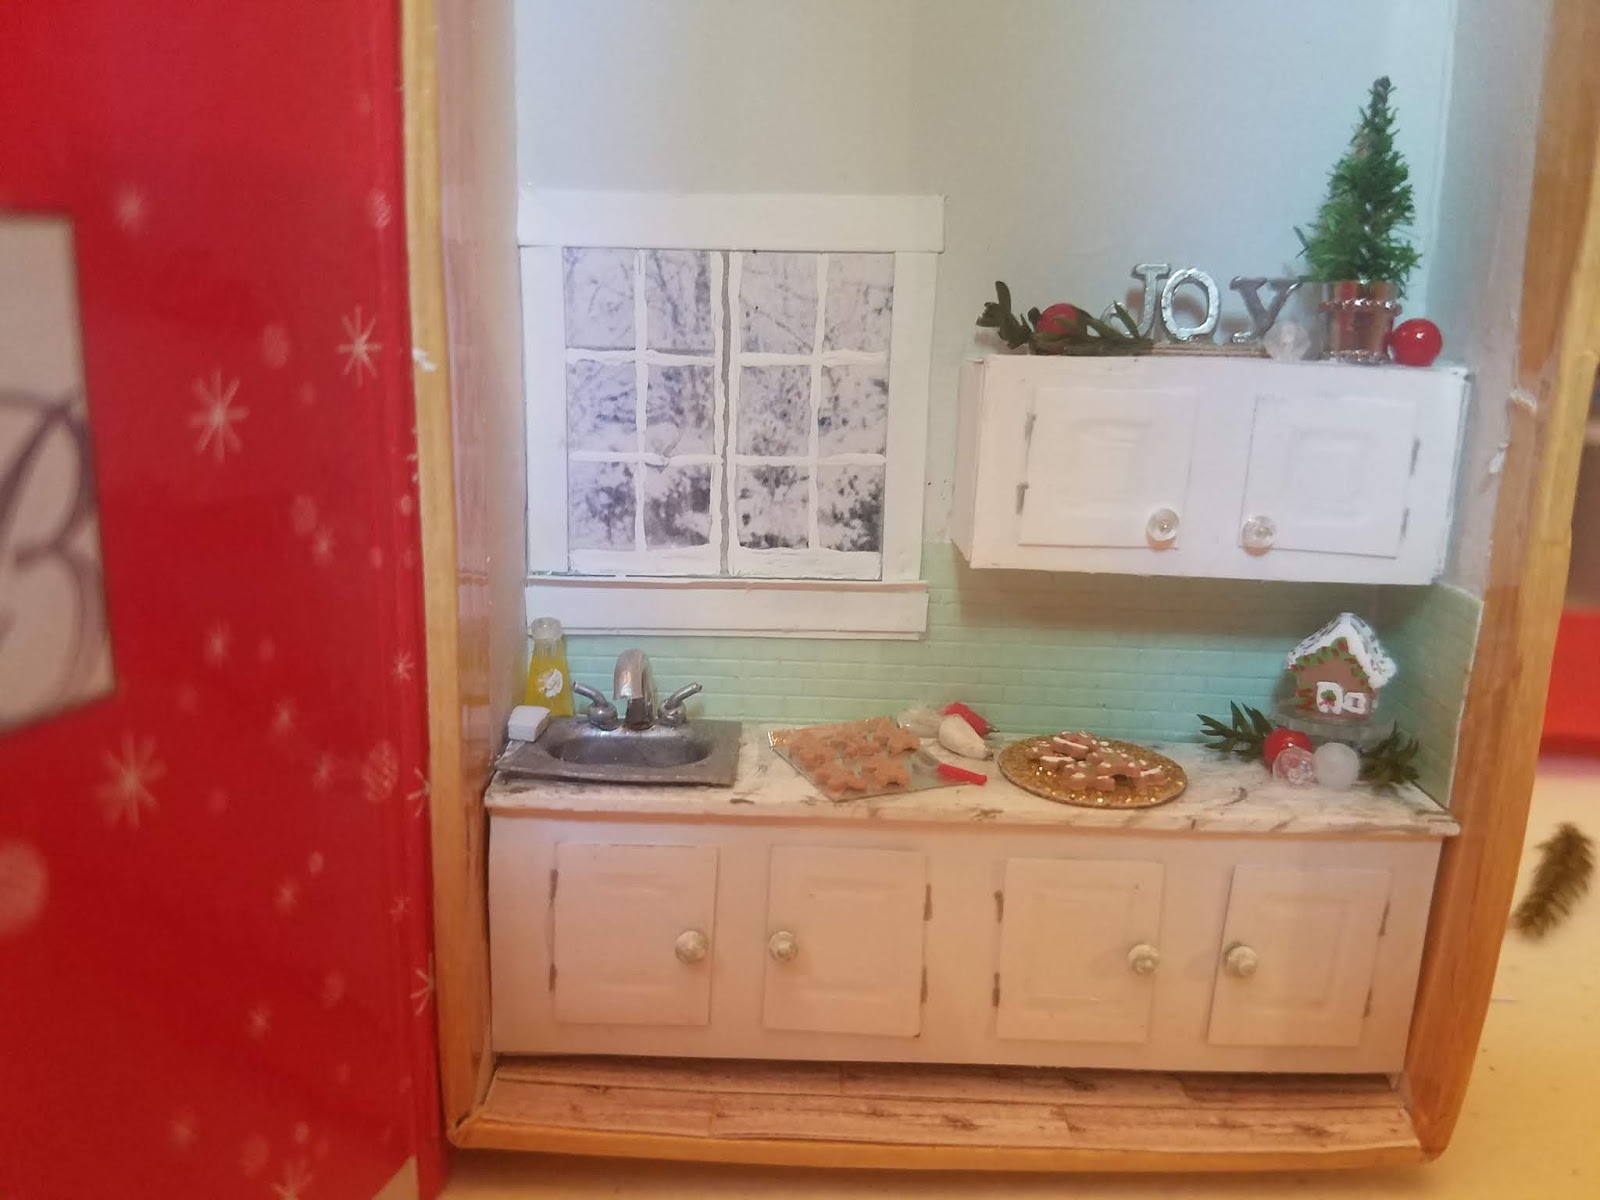
The first one I've finished should have been a one day project, not taking much more than the afternoon to finish, but of course me being me, I ended up dragging it out over about a week, because I kept adding stuff to it and hesitating to make decisions on exactly how I wanted to do a couple things for it.  I did finally put the last finishing touch on it yesterday though.  It is a 1:48 scale kitchen scene in a cute little gift card gift box that looks like a book.  They had them in several different cover designs, but for now I'm only going to show you this one because I might be using some of the others to make Christmas presents..... lol.  Since there was a gingerbread house on the cover of this one though I thought a little kitchen with a teeny tiny gingerbread house in it and gingerbread cookies being made would be perfect for it..... (fair warning the light in a lot of these pictures is pretty bad lol, since it was meant to be a quick little project I wasn't really thinking about needing great pictures, most of these were taken either mainly just for me to get a little more objective look at it, or to post a quick "this is what I'm doing right now" kind of thing on Facebook)
The front cover of the "book" (box). I also too a short video of the entire outside and it being opened that you'll see at the end of the pictures.... as long as I can figure out how to upload it on here.... I don't think I've ever tried doing a video on here before. lol
Early stages.  The cabinets are in but have no hardware so far, the tile backsplash is there, but I hadn't yet painted the walls above it, the counter is in and the sink, but the sink has no faucet or anything yet, and I'm just starting to decorate it

Basically the same as the last picture just slightly different angle.... fair warning, there may be several like that in here lol.

Getting a little bit further in the decorating.... top of the upper cabinets done too.  oh and you can't really tell in this picture but I had decided on and painted the upper part of the walls a super pale gray by this point too.

Close up of the cookies and decorating supplies..... The cookies were made using a fabulous mold from Stewart Dollhouse Creations, that even came with the clay.  The little spatula is from them as well (I bought the unpainted set and painted this one myself, the other pieces will be going in future projects).  The piping bags full of icing for decorating the cookies are little pieces of clay baked to harden and then just regular kitchen plastic wrap glued around them and the tip painted to look like a piping bag.  Oh, and the cookie sheet is just aluminum foil cut to size and then the one end folded up a bit. 

A better look at the cookies, and spatula, and icing bags

The kitchen of course had to have it's own little gingerbread house since that's what's on the front cover of the box.  This actually was - sort of - also made from a cake mold from Stewart Dollhouse Creations.... I used the square cake mold and put two layers together and cut the top to be angled like a roof and then just kind of pinched the bottom of that part to give it a little more shape. The cake stand it's sitting on was from them too!

Close up of the decorations on the tops of the upper cabinets..... the letters are floating locket charms, the tree is the top of a tiny bottle brush tree, cut off and shoved into half of a screw type jewelry closure that I removed the loop from, and the ornaments are just beads.  The springs of greens laying by themselves are tiny cuttings of preserved princess pine.

Finally got the sink finished.  The faucet is ust a bent piece of a large gauge wire and the handles are 11/0 seed beads with a little bent piece of narrow gauge wire in them and painted silver.  The dish soap I was really excited about because I really wanted dish soap, but wasn't sure how I was going to make that happen in Quarter scale, but fortunately I found perfect beads at Michael's (on sale at the time even), and i glued an 11/0 seed bead to the top and then painted the "soap" on with a little bit of light orange paint mixed with mod podge, to keep it translucent (and the right glossy finish to look like it was inside the bottle not on the outside lol), then I just dotted a small circle of white paint as a label, and it turned out so much better than I had hoped for even! Oh, and I think I forgot to mention what the sink itself is made from..... it's the blister packaging from my allergy pills cut to have a little lip around the blister part and painted metallic silver.

An overall view of the kitchen, with it mostly done.... I was still trying to decide what I wanted to do for hardware for the cabinet doors and what I wanted to do about a window at this point

An overall view of the whole kitchen after {finally} deciding on hardware for the cabinet doors

A closer view of the cabinet door handles on the bottom - they are made from 11/0 seed beads with a tiny no hole bead glued in the hole. they were then painted a color just slightly darker than the backsplash tiles, and then distressed with some white paint.  Oh I also think this is the first picture where you can really see the backsplash well.  I made it by gluing colored vellum to cardstock and then scoring the grout lines into it.  Have I mentioned yet that the cabinets are also cardstock? Which worked really well for the doors because I was able to emboss detail into them, but making the cabinets themselves from cardstock was a little more trouble than I really wanted lol. I choose cardstock so I wouldn't have to paint it and could just cut it with scissors, but I think next time I'm going to do them differently.

The upper cabinet knobs were made the same way as the lower cabinets, but instead of painting them they were left clear

And finally after dragging the project out for days, I got a window in the room.

Then decided I needed to paint the mullions instead of just the printed ones on the picture....

Then I decided it needed a little wreath (made from a piece of green pipecleaner I trimmed down so the fibers were really short, shaped with a pair of round nose pliers and then wrapped with 1/16th inch wide ribbon)

And finally I can call it finished!

The gift card holders/boxes I actually have seen at a couple different stores in my area this year (At Home, ACMoore, and I know I saw them at a 3rd store and I can't remember for sure where it was but I'm kind of thinking it was one of the Walmarts around here....) I got this box though at Dollar Tree.  It's a bit bigger (5.25" x 3.375" x 2.25" deep) and I'm planning on putting a Santa's Workshop scene in it.  I haven't really mapped it all out yet to see how it will fit, but I'm thinking a main level with shelving along the back wall and worktables in the center, with toys and presents being made and stored on that level and then a loft/second level with cubbyholes along the back wall and a desk (or maybe two) that will be the mail room/naughty and nice list headquarters..... I have some toys and supplies leftover from the toy store, that I want to use for something (a few of them went in my attic roombox that is for leftover materials from other projects, but I don't want to put everything I have more of in there) so this will be perfect to use some of that stuff!


Hopefully I will be getting that done before Christmas to post pictures of and I'm planning on doing a short post with some pictures of the little bit of progress I've made on the bookstore since last I posted, but, just in case the month gets away from me before any of that happens (as it often seems to do) I wish you all a very merry Christmas (or whatever other holidays you may be celebrating this time of year), and in case it really really gets away from me a Happy New Year too!