I should be doing housework today, I mean there's a lot I need to get done before Easter and there's only a couple weeks to do it in (which btw, how in the world are we in April already?!). But I'm not, I'm working on miniature stuff instead. Actually I was sick last weekend and the early part of this week and so once I started to feel better, I still didn't feel like really doing much so I jumped back into working on stuff for my 1:48 scale street of shops. I had gotten a pretty good start on 2 of the shops in January, but then it had gotten kind of put to the side and I hadn't really gotten a chance to work on anything much since then. Before I show off what I worked on this week let me go over the overview of the project, since the last time I posted anything I hadn't really finished planning it:
First of all it has a name now: Whimsy Street Shopping District. And I've decided on all the shops, there will be a book store in a book (still trying to figure out what the bookstore's name is going to be), a toy store in toy chest (also haven't settled on a name for this one yet either), an ice cream shop in an ice cream carton ("JellyBean's Ice Cream and Delights"), an art gallery in a shadow box frame ("Gallery B"), and a florist and garden shop in a watering can ("Willow: Florist and Garden Shop"). Ive got the basic planning done for all the stores, although I haven't completely chosen all the interior finishes for them all. I've also made a {long} list of materials and furniture/accessories I want to order for all of the stores, and I'm getting them ordered a few things at a time. I'm also still looking for just the right structures for the toy store and book store (or figuring out how I want to make them), and the ice cream shop I have to decide whether I want to use an actual ice cream carton - like as in one that once held ice cream - and if so if I want to use a brand name or a generic, or if I want to use a paper mache or cardboard box in the right shape and size and design a generic wrap around label for it myself...... The two shops that I do already have structures completely figured out and that I've started working on are"Gallery B" and "Willow: Florist and Garden Shop". For the Florist/Garden Shop I'm using a paper mache round box and an empty papertowel tube to make the "watering can", but for this post, I'm going to focus mainly on "Gallery B" because that's what I have been primarily working on this week.
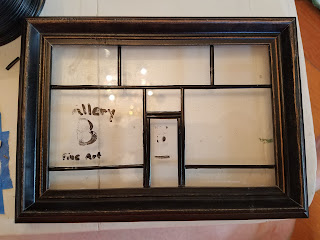
I started with a store bought 4x6 frame (Which I forgot to get a picture of before I started doing stuff to it). I had originally looked for a premade shadow box frame, but couldn't find any that would really work, for one thing I needed it to be a bit deeper then most of what I could find, so I decided to just use a regular frame and make the box part myself. For the storefront I wanted to use the frames glass to make a plate glass store front, so I started by using a dry erase marker to mock up how I wanted it to look.
My original idea was to use stick on "leading" for making faux stained glass with, but it didn't come narrow enough and was kind of expensive, so before getting it and attempting to cut it in half (and keep it straight and neat looking lol) I looked around the craft store for anything else that would be a decent alternative and came across plastic lanyard making material that was just the right width, it's not self adhesive so I did have to glue it on (and of course now have some cleaning up to do of stray glue), but ultimately it worked well, and was about a 1/4 of what the "leading" lines would have cost. I used my dry erase lines to cut the material to length and the erased them before gluing the lines on. I put them on both the outside and the inside of the glass. After they were dried I glued the glass inside the frame. I still need to figure out what I'm going to use for the handle/bar on the door and glue strips of black gloss painted balsa to the inside to cover where it was glued to the frame. And also figure out exactly what the galleries logo is going to be and paint/attach that to the window and door.
 |
| laying down the first piece of "leading" |
 |
| the inside after all of the pieces were glued on |
 |
| the outside with all of the pieces glued on |
The inside of the gallery will be all white walls and ceiling, with dark wood flooring. There are going to be skylights in the roof and several (white of course) partition type walls to display artwork. The only furniture in the shop will be a desk and chairs to handle the business end of the selling of artwork (which I have ordered a kit for and expect to be receiving some time in April. So the main thing I have to make for the interior is the artwork itself. I've been scouring everywhere that sells art as well as Pinterest for ideas/inspiration. I plan on having a variety of styles and mediums represented as well as some pieces of art framed and some unframed canvases. So the other thing I've been working on this week has been 1:48 scale canvases and artwork.
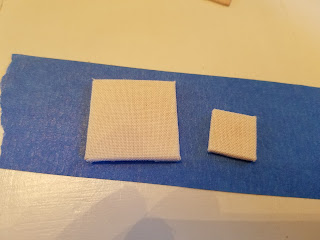
So canvases first...... there will be some framed canvases and some unframed..... to make it easier for the framed ones I'm just painting on the material without a frame under it so it can just be glued on the back of a frame, but for the unframed pieces I needed them to have some depth to them so I tried a couple different ways of making tiny canvases. The first way was to make it more like a full size frame by gluing the material (btw, the "canvas" for all the canvas art, framed or not framed, is white cotton quilting fabric with a thin layer of glue spread on the back of it to keep the paint from seeping through) to an actual frame as you would see on a full size art canvas.... and I did do one painting on that style, but the problem with it was that I couldn't really stretch it like a life size canvas would be so it looks a little loose, especially after it was painted.
 |
| the back |
 |
| the front |
 |
| after being painted (apparently I don't currently have a picture of it by itself) (both paintings acrylics) |
My second canvas making method - and the one I'm going to stick with - ended up looking better and was a bit easier to make. Instead of having a frame behind the canvas I just used a solid piece of very thin balsa (or it might have been bass..... I don't remember right now lol) and glued the fabric to the front and around the sides. I made two to start with and have done a painting on one of them and it turned out really well.
 |
| the two canvases half finished.... the little one has the corners cut to fold around the back |
 |
| front view of them finished |
 |
| and with a painting (acrylics) |
I also did a water color and some teeny tiny fruit art
 |
| watercolor on Bristol |
 |
| colored pencil on Bristol (and since these may be too tiny to see well depending on how you are viewing this picture, they are a lemon, avacado, lime, and fig.... these are 1/8 inch square.... that makes them about 6" square in scale..... they were insane to make.... the colored pencils all had to be freshly sharpened to as sharp a point as I could get them) |
After doing the art I started thinking about what I wanted framed and looking for sources for frames, but of course premade frames only come in certain sizes so I decided to try making my own, at least for some of the pieces. For now I've only made this little white one, which is pretty basic with just an angled edge on the inside, kind of a rustic look, but I did, today, get some pointed mini sanding sticks to use to make more detailed frames, and I did a little test on a piece that I had cut the wrong size for this frame and I think they are going to work really well, so I'm going to be attempting that sometime soon.
 |
| acrylics on canvas with a rustic frame made from balsa strip wood and painted with white craft paint |
So that's pretty much what I have for now.
 |
| the collection all together, sans the fruit pieces. (also - obviously - this was taken before I framed the yellow flowers one.) |
As I mentioned I have also started on the structure for the florist/garden shop as well as getting started on making some floral arrangements and other accessories for that shop, but I will post about them later, after I get a little more done on the structure...


No comments:
Post a Comment