Wednesday, April 15, 2020

{Four Season} Winter:Snow Tubing and S'mores

*this is the 3rd part of a 4 part series.... check out the first two here and here

Okay, as I said at the end of my last post, after searching Pinterest for winter outdoor party ideas I came up with the idea of a snow tubing and S'mores party, but the problem was going to be if that would actually be make-able.  My biggest issue really was what I was going to use as the base.  A snow tube was the obvious, but like the picnic basket I would have to find a basically miniature version of it.  It dawned on me that maybe I could find a drink holder pool float that was just a basic tube, but for a while it didn't look like I was going to be able to find one.  They were all some sort of {cool if you're actually using them in a pool for your drink} shape, or they had summery/tropical designs on them, and/or were more than I wanted to pay for something that I wasn't completely sure would really work even if I found one.  But then good old Dollar Tree came through for me.  I found online that they had solid color ones and that one of the colors would be perfect for a winter theme, but by this point it was probably September and I was afraid I wouldn't be able to find one anymore... I did have to go to a couple different Dollar Trees in my area but I did find them and as I thought the blue/green color was perfect.  Next was to figure out if an inflated item would even work for a project like this.  At one point I was wondering if I'd have to figure out some way to fill it with resin or something, but actually after blowing it up and stuffing a half of a foam ball in the middle (I had decided that would work well for support for the ''snow" base that would be going on top), and leaving it to sit like that for a while (it was probably at least a week) and seeing that it seemed to be holding the air well I abandoned the idea of filling it with anything other than air (I did make sure to leave the air valve accessible though when the project was finished so that more air could be put in periodically if needed over time) .

While I was testing the sustainability of the inflation I started working on figuring out the fire pit and snow tubes, since that was the majority of the scene.  I also went through several rounds of trial and error with the snow tubes.... at first I thought maybe I could find beads that would be the right size and shape, and then when I didn't I thought maybe I could partially flatten some Pony beads with my iron, but then realized that while it kind of worked shape wise they were still way too small.  I ended up somehow thinking to try punching circles out of paper, punching another hole out of the center of them and shaping them to form one half of the tube, then gluing 2 together around the edges.  That actually worked really well.  If you look too closely into the inside of the center you can tell that it's just open in there, but I can live with that, and honestly unless you do look really closely its not that obvious.  For the fire pit I decided to just go with a metal ring (aluminum foil folded over a couple times to give it a little more strength and glued into a circle and painted black) sitting on bricks (which I still have some leftover from my first 1:48 scale project the North Pole Tea Room).  I also started figuring out the log benches to go around the fire pit during this time and ended up using my miniature tabletop chop saw to cut a stick from my yard into logs and then to split them into benches, which also sit on bricks.


Once I was sure of the drink float as a snow tube for the base I had to make a snowy ground on the top of it for the scene.  There definitely wasn't going to be room to just have the scene in the center of the tube so I used air dry clay to make a shape for the ground and then covered it with a layer of white decorative sand from Dollar Tree with a little bit of white glitter mixed in.


While that was drying I started working on the fire in the fire pit.  I have to say it's the first time I've really tried to make a fake, but realistic looking fire for any type of craft project much less in this small a scale, and I'm really happy with how it turned out.  I looked for ideas online for how to do it and ended up deciding to try making the flames with hot glue and painting them with glass paint (which I then decided was too expensive so I watered down regular craft paint with spray landscape glue to use instead.)  I used more pieces of a smaller section of the stick I had cut the benches from for the fire's logs and black craft paint to char parts of them.


With the base, fire pit, benches, and snow tubes done that only left the makings for s'mores.... marshmallows on roasting sticks, chocolate bars, and graham crackers.  The marshmallows are seed beads painted matte white and glued onto pieces of thin wire.  The chocolate bars I made from clay, and the graham crackers I cut from brown card stock and embossed a bit (not that you can probably really tell with them in the tray/bucket, but oh well haha).  The tray/bucket/serving dish/whatever that the chocolate and graham crackers are in I made from some adhesive copper stripping that I have (it's meant to be used for stained glass design, but I got it to use as copper flashing on a project and its a pretty big roll of it, so I imagine I will have it to use for other stuff for quite a while...). I gave it the hammered look by texturing it with my pointed end embossing stylus.


Once I had everything glued in place I dabbed a little more of the "snow" up around the edges of everything to make it look like it is really sitting down into the snow, not just somehow floating on top of it.

Sadly I don't seem to have any good (in other words not sitting on my messy workbench) pictures of this one finished other than the calendar ones I took the other day so I suppose I will have to give it it's own photo shoot sometime soon too.... not quite sure how I'll stage that yet, but maybe inspiration will strike before I get around to actually doing it.

I think it's likely that at least part of the reason I didn't get more pictures of this one finished is because I moved pretty quickly into working on the Spring miniature and that one was probably the most involved/elaborate of all of them to make in some ways, and I needed to not take too long getting it done since the series was going to be in the miniatures show I participate in every year in December.  And that is what my next post will be...... the making of the garden tea party in a teacup

Tuesday, April 14, 2020

{Four Seasons} Autumn: "Welcome Fall" Picnic

*the one were one little project turned into two, which turned into a series

Just as I was finishing up the finishing touches on my backyard cookout in a grill miniature, I happened to be at ACMoore and came across an unfinished small decorative basket that looked like a miniature picnic basket, which of course then just had to have a miniature picnic scene in it.  I was originally going to do a springy or summery picnic in it, but then before I had really figured out theme/color scheme/materials and such I remembered a "'Welcome Fall' Picnic" party we had had in our side yard a few years before and thought it would be really cute to recreate in 1:48 scale.  So I went through my pictures until I found some good ones to work from and got started pretty much right away.

I started by "staining" the little picnic basket (actually just colored it with marker and then used a touch of a matching color paint in some of the areas that I just couldn't get to with the marker.  I also glued the lid into an upright position because I needed a fence in the background of this scene.  I then filled the cavity of the basket with foam and glued on a cut out piece of the same artificial grass that I used for the base of the backyard cookout.

I think the very first thing I made for this scene though was the pallet table.  I did make the pallet myself rather than from a kit, partly because I wanted to start working on it right away and partly to get the exact look I wanted.  The pallet itself is make from balsa wood and painted to match the weathered color of the real life pallet table and the table's legs are the ends of decorative toothpicks (which if you've read many of my other blog posts you will know I use A LOT for a variety of different miniature bits and pieces).


The next thing I worked on was what I was afraid was going to be that most difficult part of the whole project (which actually ended up not really being that bad), the teeny tiny pinwheels for the flower arrangement on the table.  I had ordered a milk jug from Stewart Dollhouse Creations (along with a few basket kits, but I'll get to them in a minute) to put the arrangement in, and made some sunflowers using a tiny star shaped hole punch and yellow cardstock, but I was actually really dreading those pinwheels, but also determined that I really really needed them.  I took apart a couple of the real life ones that I still had stored with my party supplies and scanned them in and reduced them down to scale and printed them out, cut them out, and {very delicately} folded the tips over and glued them down in the middle to make little pinwheels.  As I said definitely didn't end up being a difficult as I thought it would be.  The whole thing is larger in scale than the arrangement from the real life party was but that couldn't really be helped. lol


After getting the table and the floral arrangement done the project actually got put aside for a while and by the time I actually got back to it it was actually Fall. Once I did get back to working on it, it went pretty quickly though. I made a fence section from balsa wood, and made the "Welcome Fall" banner with paper printed with miniaturized versions of the patterned papers the pinwheels were made from.  The real life banner was fabric, but obviously that wouldn't have really been doable for this scale so paper it was.  I painted the letters on myself to mimic the original banner.  The "blankets" on the ground under the table and hay bales in the real life party were outdoor type vinyl tablecloths, so to mimic that I found fabric with similar looking print and cut them out and coated them with either mod podge or glue (I honestly don't remember now which I used, but either should work... I feel like I used the tacky glue though for this) to give it the shinier vinyl look.  The real life party had fleece blankets thrown over the hay bales for seating so I made mine for the miniature with matching (but smaller scale) cotton fabric, which I glued aluminum foil to the back of to hold a realistic shape/drape when laid over the bales.  Which FYI worked fabulously and made it so easy, so I highly suggest it as long as only one side of the fabric will be visible.  The hay bales themselves almost stumped me.  I couldn't really find any to buy that were the right size (normally I would just use O scale hay bales but the only ones I could find were a larger size bale and ones in smaller scales were too small). I went through a couple different ideas for how I might easily make my own and eventually decided to try making them from floral foam (like the green type you'd use for an artificial flower arrangement) and painting them hay colored.  I'm not sure the color is 100% spot on, but it was a close as I could get it with what I had available to use at the time and I was afraid to mess with them too much and end up having to start all over again.  Once I draped the "blankets" over them I was really happy with how they turned out.  I also put together the two 1:48 scale picnic baskets and one oval basket kits I had gotten and stained/painted them to match the baskets I used as decor at the party.  The oval basket I filled with red and yellow landscape/brush/bush material (from the model railroad/diorama department) to mimic mums.  A Mason jar with striped "straws" (little pieces of white wire that I painted stripes on), and some glasses made from clear seed beads went on top of the picnic baskets.


Once all the larger components were finished all I had left was to make the food.  The real party had grilled cheese and bacon on apple bread tea sandwiches, bacon cheddar mini quiches, apple pie cookies, apple blondies, and caramel apple bites with apple cider to wash it all down.  This mini version had the sandwiches, quiches, and apple blondies, and apple cider. I made the trays the sandwiches and quiches were in/on from basswood and made the sandwiches from tiny triangles of balsa wood and paint, and the quiches were seed beads and paint.  The cake stand for the blondies was a tiny brad from the scrapbooking section with a tiny roll of paper to make the base a little more substantial.  The blondies themselves were little squares of balsa with a little paint.  For the apple cider I ended up ordering another lemonade kit from Stewart Dollhouse Creations but instead of doing lemonade in the pitcher I made it apple cider colored.  The napkins are cut from the napkins we actually used for the real party.


And that finished up the fall picnic miniature.  I have yet to do a "cool" photo shoot with this one sitting on the life size picnic baskets like I plan too (gotta have my husband get the baskets out of the basement, he knows where they are and I do not.... but hey maybe that would be a good project for during quarantine... lol).  But I did at least take some photos of it finished. And I made a composite with a picture of the miniature and the picture of the real life event for comparison.  I'm really happy with how close they are.


At some point in the planning/working process of this miniature I decided that since I already had summer and fall outdoor entertaining themed miniatures, that I needed one for each season, and to keep with the theme it needed to be housed in something that was a part of the scene.  I immediately thought to do a garden tea party in a teacup for spring, but winter took a little bit of thinking to come up with.  After searching Pinterest for winter outdoor party ideas I finally came up with an idea, but figuring out if I could make it work took a little extra time..... and that will be a story for my next post, which will be all about "Winter: Snow Tubing and S'more's".....

Monday, April 13, 2020

{Four Seasons} Summer: Backyard Cookout

*I will be posting this series in chronological order, as far as how the project developed/evolved, and the order the pieces were finished in, rather than in seasonal order.  Which actually now that I think about it does technically end up being seasonal order, just starting with Summer rather than at the beginning of the calendar year with winter....

So starting with summer....
"Summer: Backyard Cookout"
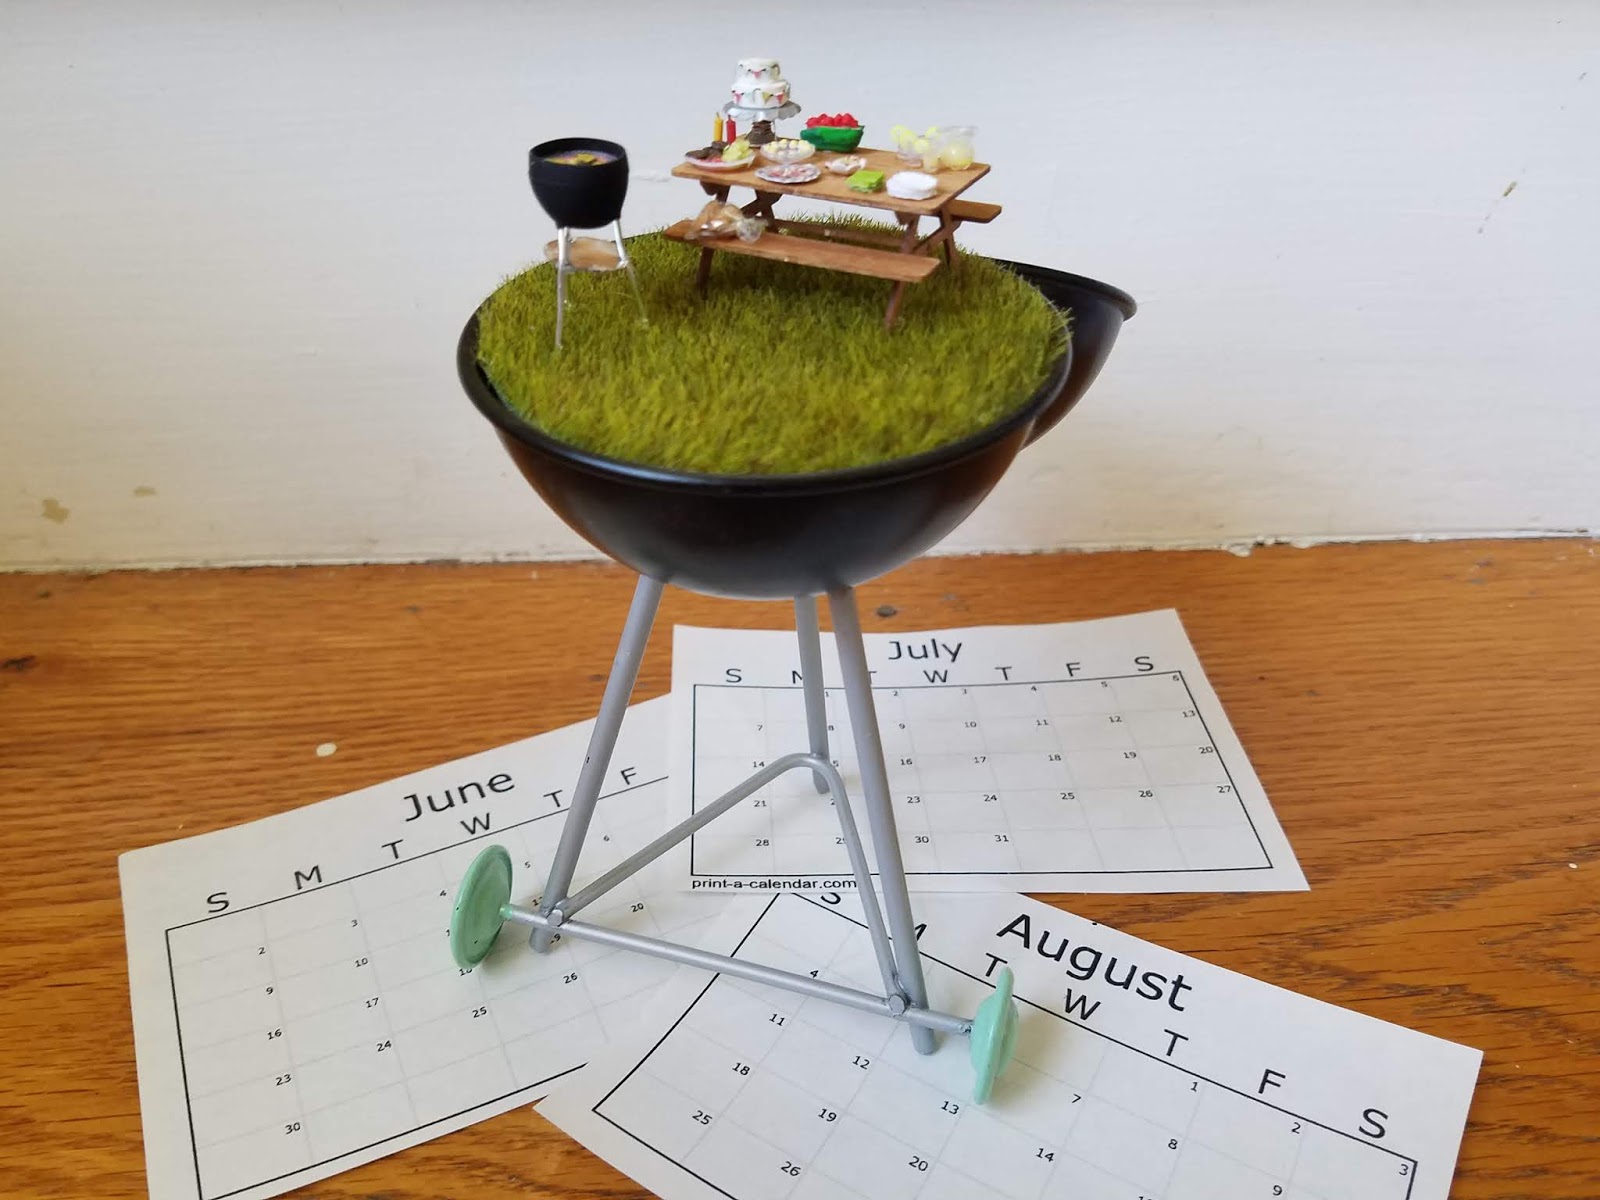
This was originally intended to be a one off, quick little weekend project, of a little backyard barbecue scene in this cute little toy(?) grill I got from Target from the Dollar Spot (which I know isn't what they call it anymore now that there's multiple price points, but I'm not 100% sure what they do call it now so we're going to just got with dollar spot for now lol) for a few dollars.
  (It obviously didn't end up staying a quick little one off project, but I'll get into how that came to be in a little bit). I actually had gotten a different little toy/decorative grill a year or two before from Target thinking I could do something with it in miniature, but it was a mint green type color, which was super pretty but not very realistic looking, and I never really ended up going any further than buying (honestly not even sure where it is right now).  When I saw the ones they had this past year and saw that the body was black and more "real" looking the idea resurfaced and this time actually happened. I knew I wanted the scene to involve a 1:48 scale grill inside the decorative/toy grill, but that's about as far as the planning had gotten the first time I bought one of these little grills.  This time I ended up with the idea of a backyard cookout party, with a grill and a picnic table set up as a buffet for the party.  Because I wanted it to be a quick project I didn't want to have to figure out the measurements for and cut all the pieces for a picnic table so I went looking for a 1:48 scale kit for it and ended up ordering one from Stewart Dollhouse Creations.  I also ordered a deviled egg mold/kit when I saw that because what good Virginia summer party doesn't include deviled eggs, and I got a kit to make a pitcher of lemonade and glasses, that came with 3D printed pitcher and glasses, and the tiniest lemon slices, and instructions on how to finish it all off. I seriously love everything I've ever gotten from them, they are one of my all time favorite places to shop for things I need for miniature projects!

This project came up right as we were getting ready to spend a weekend at my parent's house dog sitting while they were out of town, and that seemed the perfect opportunity to be able to have a whole weekend completely devoted to it and get it done. It was also a good project to bring with me because I was able to easily pack up everything I needed for it in one backpack and not have to carry too much back and forth.

The first step was making a base inside the grill for everything to sit on, which actually ended up being super easy because I had a foam ball that was just the right size when cut in half to fill the bottom section of the grill. I topped that with a circle of artificial grass that I buy at least a couple packages of every year at Walmart at Christmas time.  Its meant to be for their little Christmas villages they have, but its' perfect for miniatures.  And I really feel like it could work for pretty much any scale other than 1:144. Obviously I used it here for 1:48 and it doesn't look ridiculously long, but I've put it next to some 1:12 scale stuff and it doesn't look crazy short....

I put the picnic table together first of the kits, but the one I was really excited to do was the deviled eggs, and I'm not going to lie it was a a bit of a challenge working with bits of clay that tiny, but O.M.G. it turned out so cute!


I made the cake using the cake mold I had gotten from Stewart Dollhouse Creations back when I was doing the Flutterby Bakery.  I actually somehow ended up with kind of a lopsided cake this time, but I went ahead with it since my goal was for this to be a quick project, and I envisioned the party as being somewhat casual, maybe thrown together at the last minute, by someone who loves to entertain and absolutely would make a decorated cake for it, but was totally fine if everything wasn't 100% perfect for this particular party. The summery bunting is little tiny triangles of scrapbook paper.

The lemonade came next (because again, you can't have a summer party without lemonade!) and it just turned out so stinking cute! the lemon slices included in the kit were the perfect finishing touch!

Of course a party needs more than just deviled eggs, cake and lemonade, and again since I am from Virginia, near the Chesapeake Bay, crabs are a must have.  I ended up cutting out tiny pictures of cooked crabs, which at that size they weren't all perfectly trimmed, which you can tell in the close up pictures, but really can't tell that much on an overall picture or looking at it in person.  Also of course had to have a watermelon and I made that from clay.  Coleslaw is another necessity for a summer cookout and I made that by cutting tissue paper into the tiniest little slivers and mixing just a bit of white paint into mod podge to make the dressing for it, I was actually really happy with how it turned out. I had thought about attempting a potato salad too, but ended up deciding against it mainly for time reasons, but also partly because I wasn't convinced that I was coming up with any way to successfully make it. haha. The cake stand was made from a cardstock piece (that if I remember correctly was from a kit for something that I didn't end up using) which I folded down around the edges and then glued to a tiny screw for the base.  The plate/tray the crabs are on was a smaller circle from the same kit (I think it was supposed to make a treat stand or something.... sadly since I didn't post this when I actually made it I don't remember exactly about that), that I just shaped slightly.  The paper plates I punched from cardstock and then embossed to look like paper plates, and the napkins were cut from actual napkins that I separated into just one layer first.  I did also start making some burger patties out of clay, but I didn't get too into doing anything with them until after I got the grill done.

So, the grill. This actually gave me a lot more trouble than I expected.  After going through many different possibilities/ideas I finally settled on using a one of the extra covers from a set of earbuds that I don't really ever even use anyway, which seemed like the perfect idea.  Which it was, it just took a lot more effort to get it from earbud cover to finished grill than I expected.  I started by poking some wire into it to make the legs (which sounds easy enough, but actually was a royal pain to get them in and to stay straight and not distort anything). Then I glued a little circle of cardstock between them (also a much bigger pain to get in there with everything staying in the right place than it sounds...).  Keep in mind the earbud covers are soft so I had to keep adjusting things so that the bowl of the grill wasn't getting distorted.  My first plan was to use little pieces of black decorative vase filler gravel from Dollar Tree as the charcoal and make an actual little grill top for it.  Yeah. That didn't happen, and I actually probably worked on it way too long before accepting the fact that that was just not going to happen, lol, but I finally gave in and tapped out on that idea and ended up just printing and interior for the grill and glueing it on and that worked SOOOO much better.  The shape of the inside of the earbud cover even gave me a good surface to glue it to.

Once the grill was finally done I finished off the burgers and fixings for those.  Ive got 4 burgers still on the grill with cheese gettting melted on top and then 4 plain burgers in the platter on the table along with lettuce (little pieces of crepe paper, colored lettuce green and given some texture with my embossing stylus) and tomato slices (printed pictures of tomato slices cut out).  I had at one point thought about doing some hotdogs too, but when it came down to it I didn't really fee like making anything else and I already had the crabs so there was still more than one meat choice at this cookout. lol.

Once I glued everything in place I considered it done, and took it outside for a little photo shoot with one of our grills when we got home from the weekend at my parents.....


....However, after looking at it for a few days, I realized that I didn't have buns for the hamburgers and started thinking about how I wanted to do them.  I ended up finding adhesive round jewels at Hobby Lobby in the scrapbooking section that were the right size and shape and painted them to look like buns.  I then wrapped them in plastic wrap and tied it off with a little bit of thread to look like a twist tie.  It actually went really well and easily so I will definitely be keeping the little stick on jewels in mind for future projects.


Now it is officially done, but I've been toying with the idea of doing some sort of little fence or gate near the front in all that empty space, but have yet to decide if that's something I actually want to do or not., so it's done. lol

But..... as I was finishing up the finishing touches on this project I happened to come across a little decorative basket at ACMoore, that looked like a mini picnic basket and I thought: oooooo that would be cute with a little picnic scene on it, (which eventually evolved into the full series). But that's for my next post.......

Saturday, April 11, 2020

2019: The miniature version... {and also what I’ve been working on and planning for this year}


I knew it had been a long time since I posted anything, but when I looked and realized my last post was in 2018…. Oops!  I did actually start a post last summer, but apparently never got it finished and posted.  I do have to admit that I really didn’t get a whole lot of miniature work done this past year.  I had thought I would be finishing Whimsy Street, and also completing the 1:100 scale garage that I started for my husband’s 1:10 scale garage last year but actually neither of those ended up happening, and the only thing I really got finished last year was a smaller project series, called “Four Seasons” (more on that in a minute).  So to get caught up in this one post I’ll try to quickly talk about everything that should have gotten posted last year and then a bit about what I have planned/am working on for this year.


{2019}

So, to start with, just a quick recap of the projects that I had thought I would be finishing last year but didn’t……  Of course my biggest in-progress project is “Whimsy Street Shopping District”. (which you can read about the overall plan for here, in fact most of my posts for the past couple years have been about various aspect of this project).   I got a good start on the bookstore, which is the second to last shop I have to finish for it (assuming I don’t add any other shops to the street, there have been a couple other ideas that have popped into my head…….). The structure is put together and the outside is done, with the exception of door and windows, I haven't gotten a whole lot done on the inside yet, but I did get the floor for the bottom story (haha no pun intended) done and the main desk/front desk put together. I had also gotten a pretty good start with making books to fill the store with, but then ended up using a bunch of them for another project, so I still have tons more of them to make (which I did anyway, but now even more lol). I had planned on making all individual books for all the shelves, but after seeing how many I used for the other, much smaller project, I think I might see if I can be satisfied with making rows of books (as in one piece that are all attached to each other, with only spines glued on not whole separate books) for some of the areas of the store where you won’t be able to see the shelves/books quite as closely.  Even if I do end up doing that though I will still most likely need quite a few more individual books for places that can be seen more clearly, or where the whole shelf won’t be full, or sitting on display tables in the middle of the shop… stuff like that, so I expect that making books will be the most time consuming part of what there is still to do for that shop.  I might just have to devote a whole day or two to nothing but making minuscule books.  Once the bookstore is completed that will only leave the ice cream shop (which I haven’t gotten too far into the detailed plans for yet, but I think will probably not be as time consuming/labor intensive as the bookstore….).  Once all the shops are completed I will be making an actual street for them to go on, but I think I’m going to have it so that they  just sit on the street and are not permanently attached.  Largely because I don’t really have anywhere to store and/or display the entire street all together as one piece in my house and partly because while all the shops are part of this one larger project they can also stand alone, and I might at times want to do something with just one or just a couple of the shops separately from the project as a whole.


The other project that I was really excited to work on in 2019 was the 1:100 scale garage I am making to go in the 1:10 scale garage my husband is building for his RC cars. I’m still definitely hyped for the project, but it’s kind of on hold for now because I’ve gotten to the point that I need him to make some more decisions/put more of his garage together before I can really move forward with the tiny one.  You can read more about the beginnings of this project here though.


Now for the project I actually did do this past year, “Four Seasons”. For the sake of this post not being massively long (or massively longer than it already is anyway haha), I’m just going to give you an overview of the project and finished pictures and then I’ll do a post with more details and pictures and everything for each of the season’s separately.  This project was a 4 piece series, that started as one quick weekend project in a mini/toy grill I got from Target, in what they used to call the dollar spot (I know it’s not called that anymore since there’s a variety of price points there now, but I can never remember what it’s called now lol).  I saw it and thought it would be cute to do a backyard cookout scene in the little grill, and we were going to be dog sitting for my parents for the weekend coming up soon so I thought it would be a good project to bring with me to work on at their house, that I could get finished in the one weekend and wouldn’t require bringing but so much stuff with me.  Which was all completely true, but of course me being me, then I see a little picnic basket at ACMoore, and have to do a quick little picnic scene in that, which I end up deciding I should make a miniature version of a party we had a few years ago in our yard, which was a fall theme, so then I realize I’ve already got summer and fall, so now of course I have to come up with something for winter and spring to go with them……  I do have to say, most of them were still relatively quickly finished (spring ended up taking the longest, but still probably could have been accomplished in a weekend if I really put the effort into it…), and relatively inexpensive (Which was also one of the goals of the original idea).  I did buy a few things for them, but tried not to buy too much, and just being such small projects there wasn’t really that much that I even could have needed to buy for them anyway.  So, the series ended up being “Winter: Snow Tubing and S’mores”, “Spring: Garden Tea Party”, “Summer: Backyard Cookout”, and “Autumn: 'Welcome Fall' Picnic”. As I said, I will do posts for each piece separately with more detail and more pictures and all the stuff I would normally post about projects.
"Four Seasons": a series

"Winter: Snow Tubing And S'mores"

"Spring: Garden Tea Party"

"Summer: Backyard Cookout"

"Autumn: 'Welcome Fall' Picnic"


  {2020}

This year I do plan on working towards hopefully finishing Whimsy Street, and depending on what my husband gets done on his 1:10 scale garage working on and/or finishing the 1:100 scale garage, so far I have yet to pull either of those projects back out though.  The early part of this year has seemed to fly by, and while I should have plenty of time to be working on miniatures right now, while we are all staying home and social distancing/quarantining during the COVID-19 pandemic (which I’ll be honest is not something I ever expected to be saying, what a year we’ve all, as a nation and as a world, had so far this year!), I have been trying to use all this extra time at home to get some projects done in my real life house that have been getting pushed off for a while.  I do have another quick projects series that I’ll be doing this year, although to be honest I am behind on working on that project at this point.  The idea is a series of 1:48 scale front doors, one for each month of the year, to be displayed together once they are all completed.  My plan was to take one weekend each month and do that month’s door and have the year done by December (I actually came up with/started on this sometime between Christmas and New Years, so the December door I started working on then….  Granted its not done yet…..).  While I don’t have any of the doors finished yet, they are mostly planned out and I should be able to catch up through April if I just devote a day or two to it sometimes during this quarantine, and then be back on track for doing one a month.  Again, I will be posting more about these doors as I work on them, and if nothing else that should make sure I post to the blog at least once a month… haha….  Other than the doors project and finishing up Whimsy Street and possibly the garage, I’m not really planning on doing any other miniatures this year (as of right now anyway...), other than possibly as presents for people, especially for Christmas.  And I am going to try to get as much done on projects as I can in the next few weeks and then over the summer, because Fall is looking to be busy with traveling (assuming everything is back to normal and under control by then) with not only at least one weekend trip that was already planned for the fall, but also rescheduling 2 trips that had to be postponed from this spring….
I hope everyone is well and safe in these times, and I would love to see or hear about what projects (miniature or otherwise) you are working on while staying home this spring in the comments!