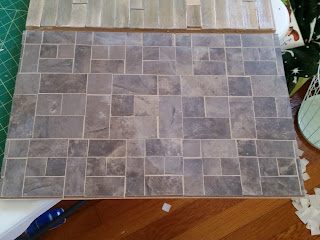
I'm not really feeling great today, so I had planned on basically spending the whole day just relaxing and watching Netflix (since I was waiting not so patiently for Fuller House and still haven't gotten a chance to watch any of it yet), but I ended up having to go out to get toilet paper anyway so i decided to go ahead and stop by Home Depot and get some grout and finish off the tiling for the front porch/patio of the Backyard Art Studio. In case you missed here is the first post about this floor/ground surface.
Here's the materials I used for the grouting
I had originally planned on using a gray grout, but I felt that I should go with a non-sanded grout because of house narrow some of the spaces between the tiles were and they only had gray in sanded, so I went with a tan color instead. This was a mix it yourself grout, which sounds easy enough but I had an awful time getting it thoroughly mixed (although that may have just been me) I actually ended up dumping it into a bowl and finishing mixing it in there. The spreader is just a rubber spreader that I got at Walmart for a dollar something to use for mixing craft paints and stuff and I thought it would work well for spreading and scraping the grout. (it did). **if you do use a spreader or a bowl or something like that for paint, or especially for something like grout make sure it is only ever used for that type of stuff again.... do not use it for food after that!**
The grout had step-by-step directions on it if you've never used grout before. I pretty much knew what I was doing, but it's super simple whether you have a clue before hand or not. The instructions for this one had me add water, mix it, then wait 10 minutes and mix it again. Of course since we are working with a much smaller area and scale than what the grout manufacturer intended, hence having to figure out some slightly different tools to use. It worked out really well, actually so I really recommend heading to Walmart and picking yourself up one of these rubber spreaders. **I didn't wear gloves because I couldn't find any, even though I know I have a bag of them somewhere, but the grout packaging does say to wear gloves so it's probably a good idea...... I just tried to be careful not to get it on my skin any if I could (I was mostly successful lol)**
Start by spreading the grout over the surface of the tile making sure it gets in between all the tiles (I worked in a couple sections at a time since I wasn't 100% sure how it was going to work)
Then hold the spreader at a 90 degree angle and scrape the excess grout off the surface
The patio floor after being scraped..... at this point you leave it sitting to let the grout set (for this grout it said 10-20 minutes.... I let it sit for about 10 for this project) you can see there is still a little grout on the tiles, but that will be taken care of in a few minutes
After the 10 minutes I wiped it down with a damp sponge to clean off the rest of the grout for the finished result. Now to just leave it sitting overnight before I mess with it any more to let the grout completely set and dry


No comments:
Post a Comment